Thursday, July 29, 2010

Clearwater Beach, Florida - First Time Vacationers!

© Spellbound Images by Wendy - All Rights Reserved

A couple weeks ago I was contacted by a family from Georgia who wanted Beach Portraits done while they were vacationing here in Florida. We set up a day and time, we discussed clothing options, and then prayed for decent weather. Since it is hurricane season in Florida some beach sessions have to be rescheduled... I try to remain flexible just in case this happens. Remember vacationers are only here for a short time, and the optimal time for shooting on the beach is a small window.


The sky was overcast, but as I've said in the past... overcast makes a giant soft box out of the sky. When we arrived on the beach, we looked up and realized just how beautiful our sky was. There were no black clouds (so no real threat of rain), just big puffy white ones that made our sky quite dramatic and very textured. We started out shooting by the dunes... they make a nice backdrop and give portraits that care free, tropical feel. I spoke with my clients about their plans while they were visiting... they had one goal other than portraits on the beach... FISHING! The children talked about where they lived and what life was like. Mom and Dad talked about children and what life was like. I quickly found a common reality with all of them and our session went just perfect.


I shot for about 45 minutes with no problems... except I realized my rechargeable batteries lose their charge over time (I didn't see that one coming). The beach wasn't too crowded and the sunset was Amazing as usual! Another ideal portrait session on the beach!

If you would like to check out all of this portrait session feel free to click here.

Until next time...

Love, Laughs and Photographs,
Wendy

All images captured with the Olympus E500 on Lexar digital media, using the Zuiko 15 – 54 wide angle zoom lens.

Enhanced by Zemanta

Monday, July 26, 2010

Digital Infrared Photography

© Spellbound Images by Wendy - All Rights Reserved


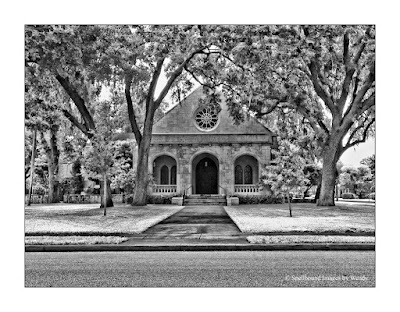
There are a few different ways to achieve digital infrared photography or at least the look of infrared. Lets talk about the different ways we can achieve this in our images today.

Why infrared?  That's simple... Infrared causes some very unique effects in our images, and most often gives us the full spectrum of a photograph that we wouldn't normally get. Of course with the new age of HDR images we can achieve great effects with full color images as well, but more on HDR in another post. Infrared also gives us a dream-like appearance to some pretty normal images.

Infrared photography used to be accomplished by using infrared film, and infrared filters. After the birth of digital photography you could have your camera modified to take infrared images by removing the hot mirror filter in front of the sensor. Now with Photoshop you can produce a pretty decent infrared image by using adjustment layers. Since I don't want to shoot film, and I certainly don't want to have my camera modified, I have chosen the last option for obtaining some decent infrared images.

First of all let me explain how to create an image that will best convert to infrared. I always talk about the golden hours for shooting outdoor images where you can not control light... where I'm using total natural light to create my photographs. Those would be the early morning hours just after sunrise, and the late evening hours just before sunset. However, for infrared photographs you would want to do just the opposite. It's crazy... but it's true! The best light for creating images that will best convert to infrared would be taken at the point of day when the sun is the brightest and highest. Probably between noon and 2:00 p.m. Depending on your time zone. Images shot at that time of day, if the sun is in fact very bright should most naturally be shot at F16, with an ISO of 100. Using a tripod is recommended for longer shutter speeds.

Once you've captured your images (I always shoot in RAW), you can begin the fun! Open your image in Photoshop (CS4 or higher). In your layers pallet click on your layers button and choose black and white to add a black and white layer mask.


Once you've added that layer mask you can move over to the adjustment tab and arrow down to find your infrared option (there are lots of other options you might want to try also).


Once you've converted your image to infrared you can play with your sliders to get the optimal look you are trying to achieve. Tweaking the green and yellow sliders will create the whites in the leaves and grass that are popular with infrared photography. You can also bring up the blues in the sky and water by tweaking the blue slider, and so on. When you are finished you can go back to your layers tab and adjust the opacity if you want to bring back some of the color in your images. Wallah! Flatten and save... your done!


Have fun creating some cool infrared photographs!  Be sure to let me know how it works out for you!

Love, Laughs, and Photographs,
Wendy


All images captured with the Olympus E500 with a Zuiko 14 – 54 wide angle zoom, on Lexar Digital Media.

Enhanced by Zemanta

Wednesday, July 21, 2010

What Do I Wear to My Beach Portrait Session?

© Spellbound Images by Wendy - All Rights Reserved

As a portrait photographer who lives near, and often works on the beach, I get asked this question time and time again. A lot of my clients are from out of town, vacationing on Clearwater Beach, or any of our surrounding beaches. It's great to have beach portraits done for future memories, and they're perfect to share with family and friends. Beach portraits also make great Holiday cards! Clients normally contact me just before arriving and want to schedule a portrait session, usually with their family, while they are in town. However, if they don't pose the what to wear question... I usually offer my suggestions to be sure they get the best possible experience out of their beach session.

Because it's hot here most of the time, or at least during the times when vacationers flock to Florida they feel shorts and sleeveless tops, or shirts are the best scenario for photo's done on our beautiful beaches. On the contrary... Slacks or capri's are best, as well as tops/shirts with sleeves work better for most people. Yes, I said sleeves. Sleeves make arms appear thinner, and slacks make legs appear thinner. That's not to say you can't wear shorts and no sleeves... but those things are best worn by models and those with perfect figures. Let's face it, not everyone has a flawless figure. If you do... then by all means wear your shorts and tank tops!

Plain colors are best... refuse the temptation to dress in bold flowers, or nautical stripes just because you're on the beach. Plain, neutral clothing will make your portraits more timeless. No one will ever look at them and comment “Oh, that is soooo 70's!” all the while chuckling out loud. Khaki and denim are favorites for the beach, and never go out of style. White is also a popular color and looks great against the blue waters, and white sands. However white is not the only color you can wear on the beach... any solid-color will do.

Another tip that I try to give larger groups... If there is someone who you would like to stand out (parent, grandparent, great grandparent), go ahead and have them dress in a different color than everyone else. Or if there are families within the family photo, give each family a different color... just be sure to keep them solid-colors. For instance... Everyone wears dark blue and the Great Grandparents wear white. Or any other combination you feel is appropriate... again... make sure they are solid.

Some female clients ask about make-up. I suggest that make up be natural for the beach. However, if you wear make-up every day, then just wear it the way you normally would. Your face should be the way people see you every day.

One last hint.... Most beach portraits are done in bare feet... so make sure your toe nails look nice. I'm not saying you should go out and get a pedicure, but be sure your toe nails are clean, and if your a female have a fresh coat of polish applied, even if it's clear. Finger nails should also be well kept for any portrait session.

I hope this helps prepare you for your next Beach Portrait Session!

Love, Laughs, & Photographs,
Wendy

All images shot with the Olympus E500 on Lexar Digital Media.

Monday, July 19, 2010

Whats Happening at Channelside in Tampa?

© Spellbound Images by Wendy - All Rights Reserved


Tall ships... that's what!! I headed for Channelside last week when I heard through the grape vine that there were some very tall sail ships to be docked there until Wednesday the 14th. I had not heard of “Sail Tampa Bay” in the past, however in 2002 an event known as the America's Sail arrived in St. Petersburg, Florida. Apparently the event didn't go over too well when organizers realized they hadn't done their homework, and there were far to many people who wanted to see the massive vessels.

We arrived at Channelside in the evening, and it seemed to be going very well. Not over crowded, no mass hysteria, in fact everything seemed to be very calm and organized. Three steel hulled ships docked at The Port of Tampa, one in clear view. The first ship we encountered was the U.S. Coast Guard Ship (photo above). Although it's sails were not dropped, it was an enormous beauty. We couldn't figure out how to board the ship, but enjoyed walking around until we found the perfect spot to photograph her large exterior. Named “Eagle” she is a training ship for the U.S. Coast Guard.


As we enjoyed a perfect dinner at the Columbia Cafe, we realized the other ships where docked further down, and as night fell, we finished up our meal and made our way to photograph the Uruguan flagged Schooner called “Captain Miranda” and the Columbian barque “Gloria.” Both as massive, and as beautiful as the “Eagle” with lights along their masts and friendly sailors on board and on shore... perfect for capturing at night.


Hopefully this event will continue and we will be able to go back year after year to enjoy these ocean beauties. If we are in fact graced with their beauty again... I will be sure to get on board the next time!

Love, Laughs, and Photographs,
Wendy

All images shot with the Olympus E500, on Lexar digital media, with the Zuiko 15-54mm wide angle zoom.

Friday, July 2, 2010

Why Haven't I Been Here Before?


© Spellbound Images by Wendy - All Rights Reserved

Lowry Park Zoo... rated the best zoo in the US by Parents Magazine, close to home, and open every day with the exception of Thanksgiving and Christmas. Plus... the parking is free! So... why haven't I been here before? All, or at least most of my children have been, my sisters have been, and my friends have been to the zoo. I'm almost positive it's because I was too busy being mommy and house wife, because I know that my older children have taken my younger children for fun filled days at the zoo, and all I have are pictures that they have brought home to show me.


Finally... I made it to the zoo (on the hottest day of the year) and created my own images of not only some very cool species but also of the surroundings at Lowry Park.  I enjoyed photographing all the animals as well as all the special props created for the separate areas! Safari Africa, Walaroo Station, Asian Gardens, the Aquatic Center, and much much more! I photographed everything I could find from Rhino's to Birds and everything in between! I took my time exploring the surroundings as much as the creatures... Lowry Park goes the extra mile to create an environment that is indicative to each of the animals natural regions.


Most people already know that Lowry Park is interesting and exciting for both young and old... but since it was my first visit I wanted to share some of my experiences through my photographs. If you are a local... and like me, haven't made it out to Lowry Park yet... you should definitely go! If you are thinking of, or are visiting the Tampa Bay area... then Lowry Park is a must in your site seeing plans!


Love, Laughs, and Photographs!
Wendy


All images captured with the Olympus E500 on Lexar digital media.